If you’ve ever thought about messing with your Android device, you’ve probably read that you need to flash a custom recovery onto it before you can do anything serious. But, you might want to ask a few questions like — what’s a recovery? What’s a custom recovery? What are my options for custom recoveries? We’re going to take a complete look at recoveries so that you can be well-informed when you start messing with your Android device.
What’s a Recovery?
The recovery, simply put, is a runtime environment (think “mini operating system”) separate from Android that can perform various system-related tasks. The stock recovery on most Android devices can apply OTA (over-the-air) updates, delete user and cache content (for factory reset purposes), and allow external tools from a microSD card to run functions on the device.
Compared to a full-sized PC, it is most similar to the BIOS in that it is a small piece of software that is independent of the operating system and can control various system settings and functions, but it does not actually perform the same exact tasks. For example, the recovery doesn’t control any I/O functions, which is entirely what the BIOS is about. The recovery also has no power as soon as Android is being loaded.
And a Custom Recovery?

A custom recovery is a non-stock recovery, which people can install over the stock recovery. There are many different reasons why someone will want to install a custom recovery — most of those reasons are extra functionality. Most of the major features include:
- The ability for third-party ROMs to be installed over the stock Android image
- The ability to perform Nandroid backups — these are very good backups that saves literally everything from your personal data to the operating system itself
- The ability to communicate with the Android Debug Bridge, or adb, on a computer for debugging and other developer-type actions, which is otherwise only possible when enabling developer tools within Android
- A more useful and/or visually-pleasing interface for the recovery, which can include touch capabilities or an interface not driven by menu options.
Long story short, custom recoveries allow you to do various things that the manufacturer may not want you to do with it. They make the stock recovery so limited for the sake of making sure that you don’t turn your device into a brick, but you know what you’re doing, right?
#CMW Recovery for Gionee P2.....Download it hereAfter you download it put it on
root of sdcard.
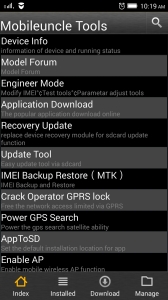
Install Mobileuncle MTK Tools from link here:
https://play.google.com/store/apps/details?id=com.mobileuncle.toolboxEnter into MobileUncle Tools and Click on “
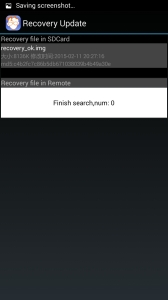
Recovery update“.

Now choose recovery image you download earlier (in this case recovery_ok.img, use either CWM or TWRP).

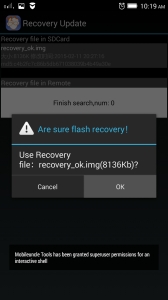
Choose OK after dialog “Are sure flash recovery!”.

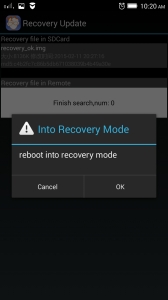
Reboot directly into recovery if you wish.

That’s all!
If you want to enter recovery from power off do this:
- Turn off the phone, uncheck quick boot mode.
- Press Volume +, Volume – and Power, all three at the same time and hold them until you see recovery screen.
Click
here to SUBSCRIBE to this Blog to Receive future updates..